Everyone has heard of a rotator cuff injury and knows someone who has “done” or “torn” theirs.
In fact, rotator cuff tears are statistically one of the top most common shoulders conditions. The numbers show that by age 50, 10% of people that don’t even have shoulder symptoms STILL have some form of rotator cuff tear present, so it’s no wonder there’s so many people complaining about theirs.
What is your rotator cuff?
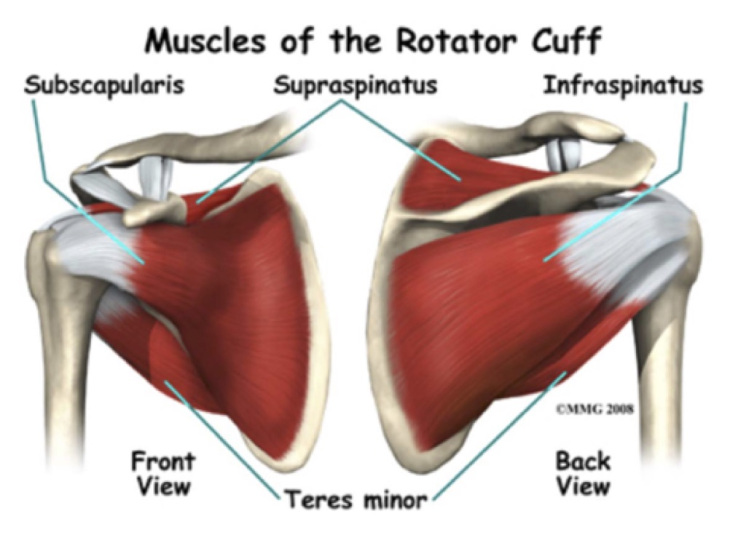
The rotator cuff is made up of a group of four relatively small muscles that sit on both the front and back of your shoulder blade (scapula). They include the supraspinatus, infraspinatus, teres minor, and subscapularis muscles.
Each of these is made up of a muscle belly (the part that contracts to produce movement), and the tendons that attach them to the shoulder blade and humeral head (the top part of your upper arm bone).
It’s these attachments at different spots around your humeral head that allow your rotator cuff to perform a number of movements, including rotating your arm in, out, and lifting it away from your body. Even when you’re not performing these specific movements, these muscles are still very active in controlling and stabilising any arm and shoulder movement.
Most rotator cuff injuries come in the form of damage to the tendons along their path from the shoulder blade to your humeral head. This is technically called tendonitis or tendinopathy, although there are other closely related conditions like shoulder impingement and bursitis that are also often involved with this type of injury.
The most commonly involved tendon is that of the supraspinatus muscle due to the pathway of the tendon between two surfaces of bone, predisposing it to being pinched or “impinged” when the arm is lifted up and moved around in an improper way. This is also why most rotator cuff injury symptoms are experienced when the arm is lifted up to the level of the shoulder and above, where this space for the tendon is narrowest.
This tendon damage can be as little as repetitive wear and tear with some inflammation and micro-tearing, or it can be much more debilitating. You might hear tears graded I-III referring to the severity of the muscle or tendon damage in a rotator cuff injury:
- Grade I: minor tearing of some of the fibres within the tendon or muscle. Symptoms are typically minimal strength and motion loss and mild pain/irritation. These typically improve in 3-4 weeks.
- Grade II: partial thickness tear with a greater number of fibres Usually create significant loss in strength, function, and can be very painful when aggravated. Can take 2-3 months to recover fully and return to high intensity activity.
- Grade III: full thickness tear across the width of the tendon or muscle. There is no longer connection between the muscle and bones at either end, resulting in a loss of any strength from that muscle. Usually less painful than Grade II tears as there is no longer any irritation to damaged and remaining fibres with muscle contraction. These require surgery if any muscle function is to be restored.
As the condition is degenerative and strongly related to consistent wear and tear, this damage tends to be more severe and of a higher grade in older sufferers, with the exception of those that occurred through sudden trauma.
What can you do if you’re suffering a rotator cuff injury yourself?
Rehabilitation exercises are great for encouraging tissue repair and strength, however you may be fighting an uphill battle if there are underlying structural issues that are setting up your rotator cuff for injury in the first place.
Poorly moving and dysfunctional joints from your spine, ribs, collar bones, neck, and shoulders can all directly predispose your muscles and tendons to injury by forcing them to perform on compromising angles and maintain a constant level of tightness as a response to poorly moving shoulder mechanics and irritated ligaments that hold your joints in place.
More often than not, the patients we see with these rotator cuff issues have dysfunction in this skeletal structurethat has likely been contributing to wear and tear on those muscles and tendons for many years before they first recognize a problem.
In practice, I address the full body regardless of the presenting complaint, and rotator cuff cases are no different. I assess the body using a grid system that addresses issues in your body’s structure in an order of priorities to best suit your body’s ability to heal in gravity.
Like everything from your pelvis upwards, the shoulder plane relies on a stable hip and pelvic dynamic to provide a level foundation for the rest of the body to work from. Addressing any leg length differences and pelvic tilts as part of the rotator cuff treatment eliminates the possibility of ongoing compensations affecting the risk of re-injury and rate of healing as a result of dysfunction and asymmetry from the ground up.
Once the structure is functioning optimally, then rehabilitation exercises are recommended.
Over the long-term, consistent rehabilitation exercises have been shown to greatly improve both symptoms and function of damaged rotator cuff muscles. There are plenty of effective exercises that you can do at home that don’t rely on more than some light weights or resistance bands:
Side-lying external rotation
- Lie on your side, positioning yourself comfortably and using your arm or a pillow to support your head.
- Bend your top elbow to 90 degrees, keeping your elbow at your side.
- Holding a light dumbbell, can of food, or other appropriate weight in your top hand (0.5-3kg is a good range for most people), take the weight from down at your belly to up as high as your arm will take it rotating outwards. Ensure your elbow remains stationary at your side throughout.

Standing Rows
- These can be performed a couple of different ways. If you have an appropriate resistance band, secure it under your foot with enough tension that you can pull your elbow past your body and still have tension when your hand is at the bottom.
If you have a dumbbell or other weight instead, find something sturdy like a bed, table, or couch to lean forward on with one arm while letting the weight hang straight down in your other arm. This will need a heavier weight than the side lying external rotations. - Making sure your shoulders and hips are square and facing the direction you’ll be pulling from, pull your elbow towards you and as far past you as is comfortable.
- Make sure your elbow stays next to your body as you pull through and squeeze your shoulder blades together and down to create good shoulder stability control that will protect your rotator cuff.
Reverse fly
- Again, this can be performed with either a band or weights. With a band, attach it in front of you, around shoulder height (a bit above or below will just change the angle of the exercise slightly), or pin one end under your foot and lean over it with a straight back, like the rows.
If using weights, you can do either single or double arm variations, both which are done with your feet together, knees slightly bent, and leaning your torso forwards. Make sure to keep a straight back and neck and let the forward bend occur at your hips. - Making sure your shoulders and hips are square and facing the direction you’ll be pulling from, pull your arm back in a horizontal arc away from your body, keeping the elbow in a slight stable bend throughout the whole movement.
- Like the rows, squeeze your shoulder blades together as you pull your arms back.

Empty can lift
- Stand with both arms by your sides with your thumbs pointed down. You may have a light weight or a resistance band that is secured under your foot on the same side.
- Keeping your arms straight, lift them in front and 45 degrees to the side of your body. Only lift to about 70-80 degrees at most, making sure your hand never comes to shoulder height or above as it may irritate your rotator cuff in this position.
- Ensure your shoulder blades are pulled back and down for the whole exercise to keep your rotator cuff working in a safe position. Make sure your thumb stays pointing down during the motion too (it’ll look like you’re emptying a can of drink).

Cross-over rear shoulder stretch
- Extend one arm out straight in front of you and then move it horizontally across your chest.
- Use the other arm to pull it tight to your chest by coming up underneath it and holding it with your hand or forearm just above the elbow of the stretching arm.
- Squeeze or loosen the stretch by pulling the arm closer or further from your chest. Make sure your shoulders aren’t shrugged up during the stretch.
- Hold for as long as is comfortable at a pain-free tension, at least 30 seconds, breathing gently throughout.

The first 4 moving exercises are most effective when you perform the eccentric part of the movement (when you bring the weight back down, or let the band come back towards the wall) SLOWLY, over the count of 3-4 seconds. This type of emphasis has been shown to be most effective in stimulating tendon recovery.
All these exercises and stretches should only be performed pain-free, taking note of any pain or soreness during or after and adjusting the number or reps, sets, and time appropriately. Also, while the problem shoulder should be the priority, doing the exercises on both is highly recommended as the research shows individuals with one affected shoulder have a much higher chance of developing issues in the other side too.
If you’re suffering from shoulder issues, it’s advised that you speak to a practitioner about addressing any underlying causes before diving into rehab, so that they can ensure you’re ahead of these problems and performing well structurally before tailoring a safe and effective healing and exercise program to you.